This post focuses on a Local environment. To prevent inadvertently exposing your cloud infrastructure to the whole world, Halyard installs Spinnaker in its most locked-down form. This means all services only bind to localhost , which only accepts connections from inside the same server.
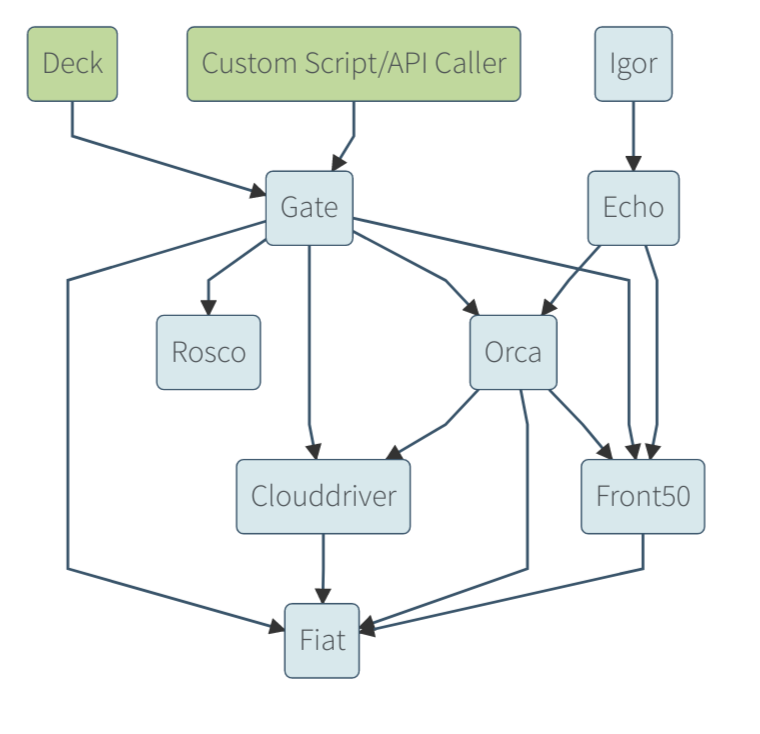
On the other hand, Distributed environment services bind to 0.0.0.0 , which allows them to receive requests from services running on different hosts. This is essential to scaling Spinnaker to large enterprise deployments as a high-availability service. The diagram below outlines Spinnaker’s micro-service architecture.
All Spinnaker micro-services can run on a single host in a Local environment, or each on its own host in a Distributed environment.
Starting Point
Because we’re focusing on the Local environment, we must first have a VM with all of Spinnaker installed. The “Halyard on GCE Quickstart” guide is a great way to get a Halyard-enabled instance up and running.
(Semi-Optional) Load Balancer and DNS Entries
It is generally a good practice to front a service with its own load balancer, so that you can change the backing implementation (say, when a new version of Spinnaker is released) without changing the way clients connect to it. A load balancer will have a (usually static) IP address that we can bind to a DNS name. More details on configuring static IPs and connecting them to DNS can be found here.
This step is only semi-optional because most users are going to want to hook up an authentication mechanism like OAuth 2.0, which doesn’t work with raw IP addresses on some OAuth providers.
Opening Gate and Deck
With DNS entries configured, we can now open Gate and Deck for external access. To do this for a Local environment, we need to hook into the custom service settings feature of Halyard.
We’ll specify the 0.0.0.0 host in both gate.yml and deck.yml in our default Halyard deployment with this command:
echo "host: 0.0.0.0" | tee \
    ~/.hal/default/service-settings/gate.yml \
    ~/.hal/default/service-settings/deck.yml
sudo hal deploy apply
You can test this out by navigating to the instance’s public IP address on port 9000 in your browser.
Note: You may need to take further action by editing your Security Groups in order to access your instance. For example, a Google Compute Engine instance needs a firewall rule that allows ports 8084 and 9000 through. You can create these with the following commands:
INSTANCE= # put your instance's name here
TAGNAME=blogpost
Gate and Deck are now listening for all connections, and the security groups are permitting access to ports 8084 and 9000. The last thing is configuring Gate and Deck to talk to each other over their DNS names instead of IP address. This is accomplished with the following commands:
hal config security ui edit \
    --override-base-url http://spinnaker.mydomain.org:9000

hal config security api edit \
    --override-base-url http://spinnaker.mydomain.org:8084
hal deploy apply
Test it out
Your Spinnaker instance should now be available and mapped to your DNS entry:
Now that Spinnaker is exposed for your end users, you should explore our different authentication and authorization mechanisms in the Securitydocumentation.
容器推出以来,给软件开发带来了极具传染性的振奋和创新,并获得了来自各个行业、各个领域的巨大的支持——从大企业到初创公司,从研发到各类 IT 人员等等。跨境知名电商小红书随着业务的铺开,线上部署单元的数量急剧增加,以 Jenkins 调用脚本进行文件推送的部署模式已经不能适应需求。本文作者介绍小红书如何以最小的投入,最低的开发量快速的实现容器化镜像部署,以及由此带来的收益。
Story point,翻译成中文即为故事点。
故事点是Scrum团队使用的一种随机度量方式,用来度量实现一个故事需要付出的工作量”,还可能是“故事点数的估算混合了对于开发特性所要付出的努力、开发复杂度、个中风险以及类似东西。
我们也可以理解为可以用story point来衡量一个issue的难度或工作量。
二、story point的预估
估计story point常用的两个标准如下,在这里我主要以Fibonacci为例讲解。
Fibonacci: 0, ½, 1, 2, 3, 5, 8, 13, 21,34, 55, 89
Power of 2: 0, 1, 2, 4, 8, 16, 32, 64,128
story point虽然可以分为12个等级,但我们在现实中一般只采用0、1、2、3、5、8、13这七个等级。如果在预估中发现超过13的,我们一般把任务进行分割,分割为两部分,循环该步骤,直至所有point都小于等于13。