One of the things we are commonly asked in the Spinnaker chat room is “How do I open Spinnaker up to end users?”
The answer depends on how you deploy Spinnaker — with a Local or Distributed environment.
This post focuses on a Local environment. To prevent inadvertently exposing your cloud infrastructure to the whole world, Halyard installs Spinnaker in its most locked-down form. This means all services only bind to localhost , which only accepts connections from inside the same server.
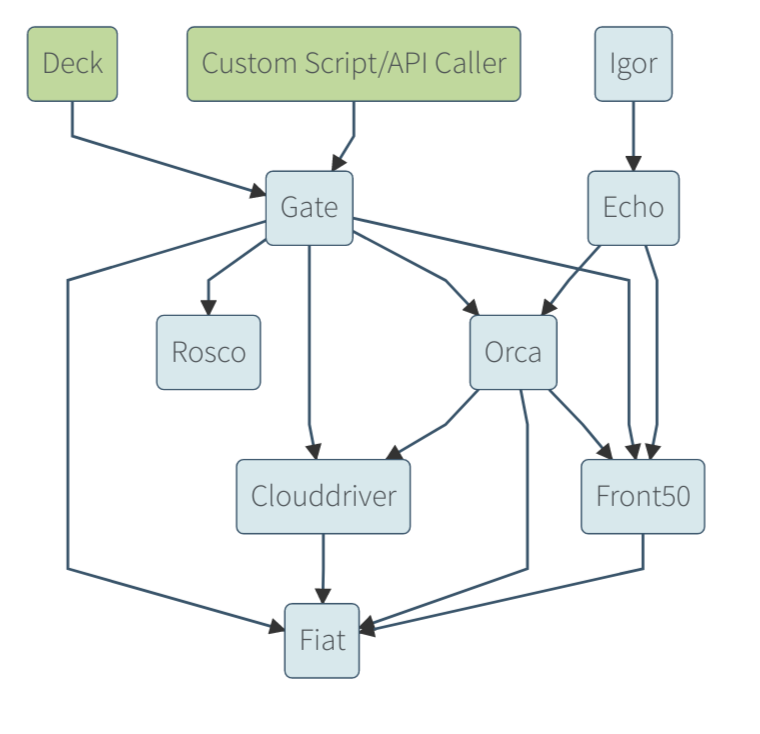
On the other hand, Distributed environment services bind to 0.0.0.0 , which allows them to receive requests from services running on different hosts. This is essential to scaling Spinnaker to large enterprise deployments as a high-availability service. The diagram below outlines Spinnaker’s micro-service architecture.

Starting Point
Because we’re focusing on the Local environment, we must first have a VM with all of Spinnaker installed. The “Halyard on GCE Quickstart” guide is a great way to get a Halyard-enabled instance up and running.
(Semi-Optional) Load Balancer and DNS Entries
It is generally a good practice to front a service with its own load balancer, so that you can change the backing implementation (say, when a new version of Spinnaker is released) without changing the way clients connect to it. A load balancer will have a (usually static) IP address that we can bind to a DNS name. More details on configuring static IPs and connecting them to DNS can be found here.
This step is only semi-optional because most users are going to want to hook up an authentication mechanism like OAuth 2.0, which doesn’t work with raw IP addresses on some OAuth providers.
Opening Gate and Deck
With DNS entries configured, we can now open Gate and Deck for external access. To do this for a Local environment, we need to hook into the custom service settings feature of Halyard.
We’ll specify the 0.0.0.0 host in both gate.yml and deck.yml in our default Halyard deployment with this command:
echo "host: 0.0.0.0" | tee \
    ~/.hal/default/service-settings/gate.yml \
    ~/.hal/default/service-settings/deck.yml
sudo hal deploy apply
You can test this out by navigating to the instance’s public IP address on port 9000 in your browser.
Note: You may need to take further action by editing your Security Groups in order to access your instance. For example, a Google Compute Engine instance needs a firewall rule that allows ports 8084 and 9000 through. You can create these with the following commands:
INSTANCE= # put your instance's name here
TAGNAME=blogpost
gcloud compute firewall-rules create $TAGNAME-1 \
    --allow=tcp:8084,tcp:9000 \
    --target-tags $TAGNAME
gcloud compute instances add-tags $INSTANCE --tags=$TAGNAME
Map to your DNS address
Gate and Deck are now listening for all connections, and the security groups are permitting access to ports 8084 and 9000. The last thing is configuring Gate and Deck to talk to each other over their DNS names instead of IP address. This is accomplished with the following commands:
hal config security ui edit \
    --override-base-url http://spinnaker.mydomain.org:9000

hal config security api edit \
    --override-base-url http://spinnaker.mydomain.org:8084
hal deploy apply
Test it out
Your Spinnaker instance should now be available and mapped to your DNS entry:

Now that Spinnaker is exposed for your end users, you should explore our different authentication and authorization mechanisms in the Securitydocumentation.

